If you’re a nerd like me, or you have kids (also like me), then guaranteed you have 5 or 6 different controllers strewn about the couch, coffee table, or stuffed in a drawer.
Either that or you just have a gaming setup and just want to put your beautiful collection on display (which I commend you for).
Controllers are weird shapes and sizes, and with another new generation of consoles here we just added to that collection.
Not to mention I have some old PS1 and N64 controller which would look cool on display.
I started looking around the internet for interesting solutions, and I decided to try all of them all and document it.
So here’s 4 ways for storing or displaying your controllers.
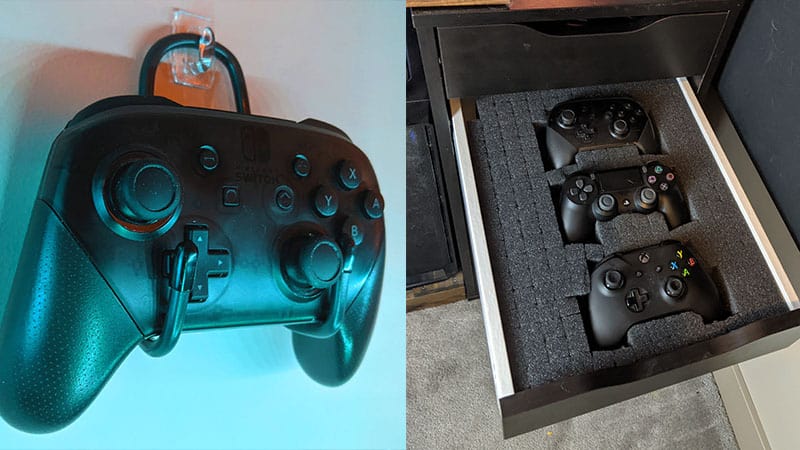
1. Foam Controller Holder
I found this foam insert with perforated squares at the hardware store. Believe it or not, this foam was actually meant for a Makita Drill to fit snugly inside it’s case. It just so happens to be the exact size of an IKEA drawer.
You can find the Amazon Listing here.
The process is super simple.
Step 1 – Buy a foam block and place your controllers on top as a visual aid.
Step 2 – Trace out your controllers with a sharpie, and remove the squares beneath.
If your foam does not have removable sections, carefully use a knife to cut out the traced line.
Don’t remove too much. We want to keep some of the padding surrounding the controllers so they sit snug. You can always remove more later if necessary (but you can’t put it back).
Step 3 – Place the foam insert in your drawer. Now place some left over pieces of foam underneath the controllers to give them a little more height and padding.
Step 4 – Done
While this looks pretty cool and gives me some James Bond vibes, I have to question the overall practicality.
It takes up the entire drawer for a few controllers. And overtime your controllers will ultimately change as new consoles release.
(Although you could argue that Playstation and Xbox controllers have remained mostly the same)
With all the being said, you might have a rare item in your collection that you want out-of-sight but still within a beautiful display. This could be right up your alley.
2. Drawer Organizers
I kind of lucked out with this one.
I found a bunch of these different shaped desk organizers at the dollar store. They’re each 6.5″ wide, 3″ deep, and 12″ long, which is perfect for standing up a row of controllers.
The widest controller (Playstation) is 6″. So as long as you can find something just slightly wider you can perfectly stack your controllers.
I grabbed a smaller square more for cables and chargers. And now I have neatly organized controller storage solution to sit inside a cabinet.
Stack your controllers neatly in a row, and keep loose cables or batteries in a nearby box.
3. DIY Controller Wall Mount
What if you want to neatly display all your controllers on the wall and still have easy access?
There’s a few (over-priced) products you can purchase. But we can make our own for a few dollars.
I made these with some thick electrical wire that can be bent into any shape. Perfect for holding an assortment of controllers.
What you need:
- A few feet of #8 or #6 gauge electrical wire (or thicker).
- Vinyl screw thread protectors
- Command Hooks
- Snips or side cutters (something to cut the wire with)
Buying Electrical Wire
Most hardware stores have spools of electrical wire that allow you to purchase a custom length.
I found 18″ of wire was suitable for a single controller. Multiply that by the number of controller you wish to hold.
Remember: the smaller the gauge number, the thicker the wire (I know, it sounds backwards). A good size to hold our controllers is a #8 solid wire or a #6. You can go even thicker if you prefer the look.
Steps To Build Your Controller Holders
Step 1 – Bend your wire
Don’t cut any wire yet, we’ll create the shape we want first, then cut off the excess (to save as much as possible).
Using your fingers – bend a hook shape just big enough to wrap around the bottom of the controller.
Using the picture instructions below – we want to create 2 “hooks” that will hang on to our controller. And the curve at the top will be where we mount the wire to the wall.
Place your controller inside our newly formed wire and make sure it fits snug but still have easy access. The nice thing with wire is we can make any little adjustments we like.
Once you’re happy with the shape, use your snips to cut off any of the excess wire.
I found “screw thread protectors” at a hardware store bulk-bin for $0.15 each. They’ll be perfect caps to hide the copper wire. I slid these over top of the wire to give it a finished look
Step 2 – Repeat for the process
That’s one down – now do the same process for each one of your controllers. Each controller will be a slightly different size and shape, so make sure you don’t mix up your finished products.
Step 4 – Mount Your Wire
There’s plenty of ways to do this. But the easiest is to buy a few command hooks while you’re at the store. They’re easy to apply and remove and won’t damage your wall. (Also, you can make adjustments if you mess up your alignment).
Read the package and make sure it can support the weight of your controller!
I purchased a few of these small clear ones that can support up to 30lbs.
Now mount your collection!
4. Pin board / Tool Board Holders
Another idea that I observed through Reddit one day. I noticed someone had cleverly placed tool board to the side of your PC Gaming setup and had all their cables and controllers within arms reach.
It looks great, it’s super cheap, and incredibly handy.
A 4′ x 2′ piece of pegboard costs about $10, which you can cut down to any size. Hooks will be a few dollars a piece, unless you buy a full kit.
Personally, I think it looks way cooler if you paint your pinboard black or to match your room.
Remember: Don’t place your pin board directly on that wall. You need some space behind the board to make room for hooks.