During the 2020 quarantine I’ve been looking for things to build and ways to pass the time.
One of my normal hobbies was always DJing at parties.
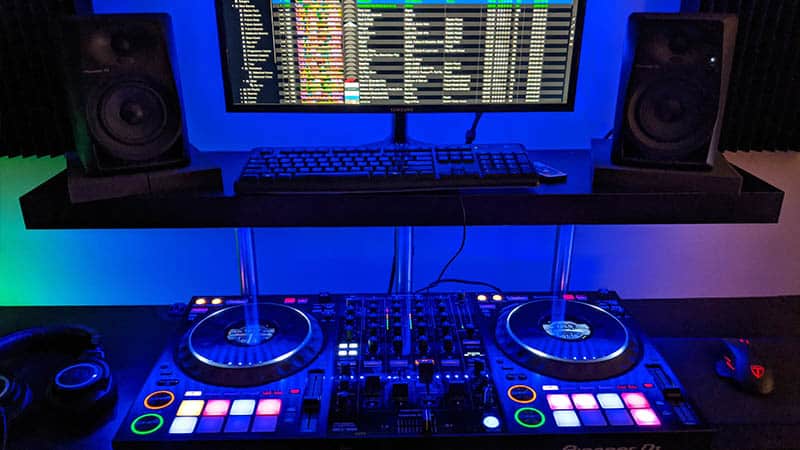
Naturally, I needed to build a DJ booth with party lights so I could recreate the proper clubbing experience at home (with my cats as my audience).
My requirements were as follows:
- Easy to build
- Easy on the wallet
- Looks cool
The IKEA DJ Booth Was Born
I sorted through dozens of DIY IKEA hacks and how-to’s through Google and Pinterest and drew inspiration from each.
From those designs I came up with this final version.
I’ve created instructions so you can copy it exactly, and some tips for modifications. Along with a few safety precautions.
About This Booth
Changes I Made
For the sake of simplicity and minor improvements; I made a few small changes to the standard IKEA booths I found on the internet.
- I adjusted the height so the desktop lines up perfectly with your bent elbow.
- I added more legs to to the bottom for extra weight capacity (4 was not enough)
- Lastly, I used a single shelf for the laptop and speakers (some people made 3 individual platforms)
The Perfect Height
Placing CAPITA legs on the bottom of our booth adds an extra 4″ of height. Assuming our DJ controller is another 2″ high, that gives us the perfect height for a 90 degree elbow bend inline with the top of the jog wheels (not too high and not too low).
This is of course if you’re of average height. If you’re incredibly tall you may need to make some adjustments.
Additionally, the LACK shelf (where our laptop and speakers sit) gives us a comfortable height to look at the screen without any neck strain.
What you’ll need
- KALLAX Shelf unit (Get the one with 2 rows of shelves)
- CAPITA Legs x 8
- GODMORGAN Legs x 3
- LACK Shelf
- 1/2″ (3″ long) Hex Bolts x 3
- 1/2″ Washers x 3
Tools:
- Drill
- 5/16″ Drill bit
- Measuring Tape
- 1/2″ Wrench
Side note – When you pick up your bolts, bring a GODMORGAN leg with you and ensure the bolt will thread properly into the leg.
Putting it together
This is a pretty straight forward build. All you’ll need is a few basic tools and an extra set of hands to assist in standing the unit up.
1. Put together your KALLAX shelf
Step 1 is easy, using your IKEA instructions put together the KALLAX shelf in it’s entirety.
2. Attach CAPITA Legs to underside of the KALLAX shelf
Using a drill or screwdriver, securely attach all 8 CAPITA legs to the bottom. Place one at each corner, and then the final 4 legs evenly spaced to distribute the load.
With help, stand the KALLAX unit up on the legs.
3. Attach GODMORGON legs to LACK shelf
Now it’s time to attach the GODMORGON legs to the bottom of the LACK Shelf.
I moved the legs forward slightly (so the shelf will shift back) to ensure the shelf won’t get in the way when trying to view or play with your DJ gear.
4. Drill holes where the GODMORGAN legs will go
The next step is to drill three holes with a 5/16″ drill bit. These holes will serve as a way to feed a bolt through the hole and into the bottom of the GODMORGAN legs.
Do Not Go Exactly Center!
There is a shelf column right in the middle of the KALLAX shelf which blocks the path where our hole (and bolt) will go. Therefore we can shift the entire shelf slightly to the left or right to make room.
Alternatively, we can shift just the middle table leg over to the right or left by about 1 inch. (This is what I ended up doing)
Mark Your Holes
With some assistance, hold your shelf and line up the legs where you would like them to go. Using a pencil mark around the bottom of each column (you can still see pencil on dark surfaces under a bright light)
Using a drill and 5/16″ bit, go straight down in the center of each marked circle.
5. Bolt LACK Shelf to KALLAX Shelf
Place washers on the each of the bolts. Place your LACK shelf and GODMORGON legs over the 3 holes, and feed in the bolts. Using a wrench, tighten the bolts down until snug.
Do not over tighten!
Remember the KALLAX shelf is not made from real wood and can easily be crushed. Tighten just enough so all three bolts are snug and won’t wobble around.
6. Add The Rest Of Your Stuff
That’s pretty much it. Now it’s time to plug in your DJ gear, speakers, laptop, etc… Add a few LED strips (which we’ll cover in a second), and you’re good to go.
Weight Restrictions and Safety
Don’t Overload The Top Shelf
The top shelf on this specific booth is the weakest point.
You may have noticed I used a single row of legs for support.
With 3 bolts holding it in place the shelf is absolutely sturdy enough for two small monitors and a laptop or computer screen. Which affords me more space for my DJ gear.
However, anything heavier might be too much.
My Pioneer DM-40 monitors, for example, weigh 5.5 lbs each. While the popular Yamaha HSM8 monitors weigh in at 22.5 lbs each!
Make The Top Shelf Stronger
If you want to go big – simply add more legs to create a table-like structure rather than a single row.
This will give a huge bonus to structural integrity. But you’ll sacrifice table space in return (and it might not comfortably fit your controller).
You could go a step further and create individual platforms for each speaker. Or you can even mount your speakers directly on the wall behind the booth.
Vinyl Collection
If you’re going to pack a KALLAX shelf with vinyl then I would recommend not using CAPITA table legs on the bottom like I did. Instead place the shelf directly on the floor or create a sturdy wood frame to support it.
Vinyl is incredibly heavy in large doses. So I would take some precaution before potentially overloading your shelf and potentially damaging your collection.
Adding lights
DJing just isn’t the same without some atmosphere. We need RGB.
Applying some low-cost LEDs is incredibly easy. That hardest part is just hiding the cables so it maintains it’s sleek look.
Simply head over to Amazon, Ebay, or Aliexpress and find an LED RGB strip with an adhesive side.
Some are powered by USB while others use a regular wall receptacle.
Where to place your LED Strips
Tiny LEDs are surprisingly bright. Save your eyes by placing them out of view and allowing them to light up your surroundings instead. The adhesive makes this easy.
Place a strip on the underside of your LACK shelf. And place another all along the back side of the desk to reflect off the wall behind it. A simple remote control or phone app allows you full control of the colors and effects.
You can also replace the lights in your room with an RGB Smart Bulb which allows you to control the color from your phone.
You can even go a step further and buy some sound responsive lights, or tiny LED disco ball to create some cool (and budget friendly) effects.
Hiding Cables
Lastly we need to make our booth look clean and tidy.
With our DJ Gear, computer cables, audio cables, and lighting… It can turn into a bird next of cables.
Velcro Ties for the win
Notice how I make clever use of the support legs and some velcro ties to keep everything hidden from view.
Likewise, I used some double sided tape to hold the LED transmitter (the white box). Along with some adhesive cable tie mounts (those little white square to the top right) to hold the cables in place.
Hiding cables in plain sight
One great tip I picked up was hiding all my cables in a box. I picked up these black boxes from IKEA and cut a hole in back.
I then fed USB and audio hubs and other loose cables inside. I have easy access, but it keeps the mess locked away.