You’ve probably seen it by now…
The same desk and drawer combo used in pretty much every fancy PC Gaming setup. If haven’t noticed yet then let me get you up to speed.
If you were to browse Reddit r/battlestations or gaming setups on YouTube, you may notice the gaming / office setups are all eerily similar. That’s because there’s a very popular trend of using specific IKEA parts.
Why?
It looks sleek and professional, yet is incredibly easy to put together. Not to mention it’s within most people’s budget.
I followed this recipe, and I’ll show you exactly how to build it, and a few extra things we learned during the process.
The Main Components
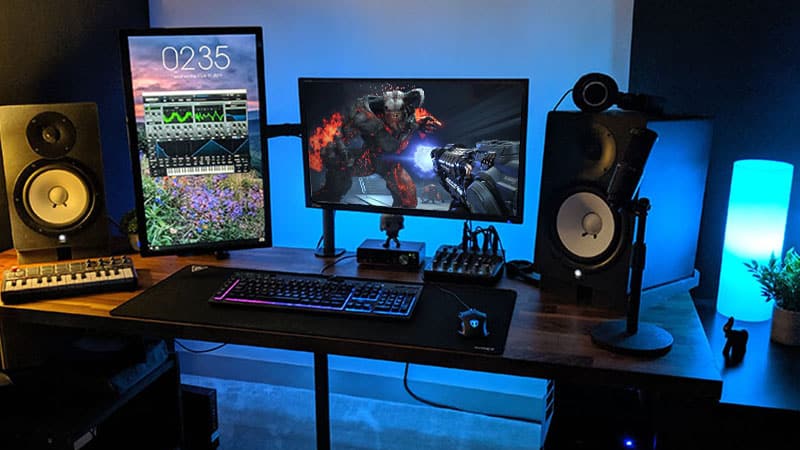
The typical IKEA gaming setup looks like this.
1. The Tabletop
Pick out a tabletop (KARLBY or LINNMON are the popular choices).
There’s a lot of choices, but the best bang for your buck is the KARLBY butcher block desktop. Just remember that butcher block requires some extra care (more on that below).
Also note these desktops come in various lengths: 59″ and up to 78 3/4″
If you want your PC to sit on-top of your desk along with dual-monitors of an ultra wide monitor then I highly recommend the wider desktop.
2. Table Legs
There’s a few choices here. The least expensive option is to buy 5 ADILS table legs and screw them into each corner (and one in the center).
It’s fine – but a little boring…
ALEX Drawers
The more popular choice is buying ALEX drawers and simply placing your tabletop across both of them.
SIDE NOTE: The ALEX Drawer comes with sticky Plastic Bumpers to protect the surface. Place these on the top surface of the drawer unit where the desktop will be placed.
It just so happens that ALEX drawers and ADILS legs are the exact same height. In which case, you might want to have drawers on one side and legs on the other. The choice is yours.
3. Add Your PC / Monitors / Speakers / Peripherals
Okay you have a desk now – let’s get your PC setup.
Monitors:
You could place your monitors directly on the desk. However, the much better choice is to mount them directly to your desk with a clamp.
Why is this important?
- It frees up a lot of desk space
- It looks cleaner and sleek
- You can position the monitor perfectly to lessen neck strain
Where To Place Your PC?
If you have a custom built PC with all the color-changing RGB then you obviously need to show it off. Place it on the right or left side of your desk in all it’s glory.
If you rather be more discreet – place it near your feet. However, I recommend at least placing your PC case on a platform and not directly on the floor. It will protect it from dust, static, and possible mishaps such as flooding.
There’s going to be several cables sprouting from the back of your computer that we need to deal with…
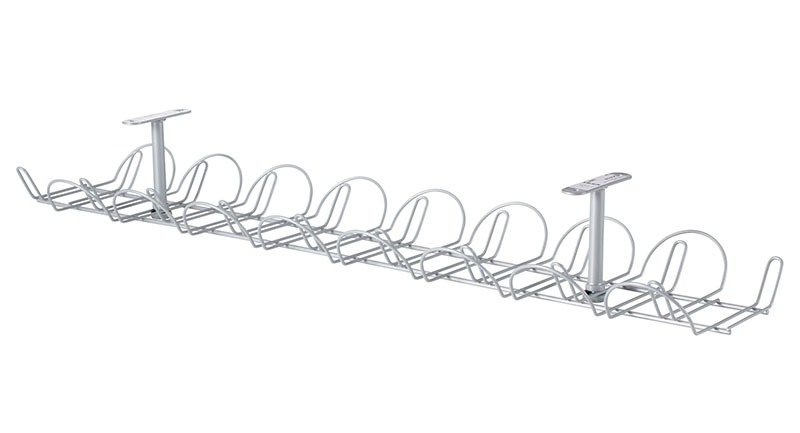
4. Cable Management
Cable and wire management shouldn’t be overlooked. Having a nest of messy wires immediately diminishes the look of your new setup. Also the internet will judge and laugh – so we can’t have that.
The quickest and easiest method is to pick up one or two SIGNUM wire trays while you’re at IKEA.
Simply mount them on the underside of your desk and neatly place all your cables inside.
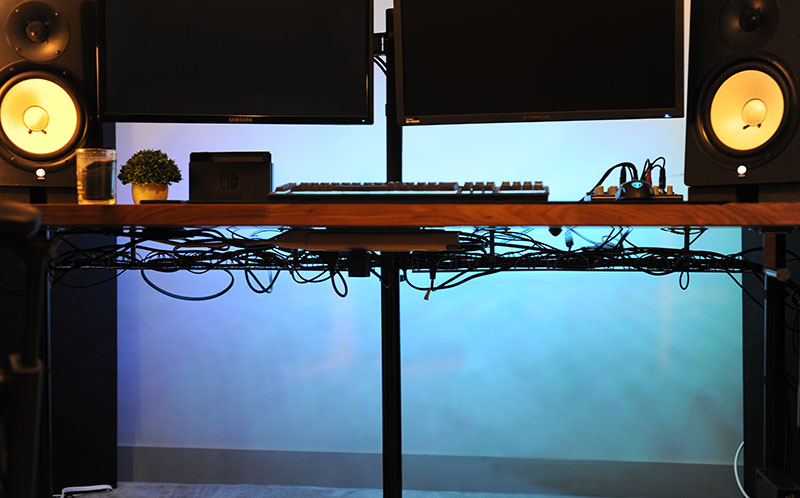
Another solution is to mount Power Strips/Bars underneath your desk or behind your drawers. Again, this keep those cables neat and tidy and out of sight. See more cable management solutions here.
The same can be said for hiding cables on top your desk as well. Make clever use of hidden edges to keep cables out of sight. Use zip-ties or velcro ties to keep them in place.
5. Get Creative
RGB
Ah yes, how could we forget the most important part of building a gaming setup – all the pretty colors.
We have a full guide coming up on how to light up your desk and shelves.
In the meantime I recommend just picking up some LED strips online through Amazon. If you’re really trying to save some money then Aliexpress is incredibly inexpensive, but comes with long shipping times.
Purchase strips with an adhesive side for easy placement.
Always place RGB LED strips out of sight. They’re brighter than you think, and it will be like staring into the sun.
You want a soft glow emanating from the corners of your room. Place strips along the backside of your desk for maximum effect.
You can go a step further and light up the inside of your PC.
Accessorize
This is pretty much up to you. But I find a minimalist approach has the best affect. A few small plants or a figurine can bring the whole setup together.
Some accessory ideas to add to your setup:
- Small plants
- Extra large gaming mouse pad
- Align your gaming controllers neatly
- RGB Keyboard, mouse, or mouse pad
- POP! Funko figurines
- RGB lamp
- Headphone stand
- Phone or tablet holder / mount
- A small art piece
Getting Some Extra Height
Your standard IKEA table leg or ALEX drawer is about 27 1/2″ high. Some people find adding a few extra inches is more comfortable (especially if you’re tall).
There’s an easy solution: add small furniture legs between your ALEX drawer and your desk.
Any furniture store will have this stubby legs that are perfect for the job.
Caring for your desk – this is important!
You may not have thought of this – but you need to oil up your KARLBY desktop a few times per year. Sounds weird I know, but trust me on this.
If you leave it for too long the surface will become dry and begin to crack. The good news is maintaining your desktop is easy and leaves it looking shiny and awesome.
- Simply buy some food-safe mineral oil from your hardware or furniture store.
- Remove everything from your desk and clean any dust off.
- Generously dampen a cloth with mineral oil, don’t worry about using too much.
- Give your desk a thorough wipe down.
- Let sit for at least 8 hours
- Use a clean dry cloth to wipe up excess oil.
- You’re ready to use your desk again.
I typically do this 3 times per year and have never had any problems. But it can depend on how dry your part of the world is.
Look at your desk in direct light – if it appears dull it may be time for another oil bath. Here’s a short video that explains the process.